

For a compacted crushed rock base, plan on about 100 mm under a patio or walkway, somewhat more under a shed slab, a standard depth under a typical driveway, and increased depth for heavy-traffic driveways. Soft clay, poor drainage, or unusually heavy loads require thicker base depths than usual. Get there by compacting in thin lifts rather than dumping the full depth in one pass.
TL;DR:
- Increasing base depth is necessary for poorly drained, clayey, or high-load soils, with subgrade stabilization suggested for very weak ground.
- Extending the base material beyond the finished edge by at least 150 mm in all directions helps prevent edge slumping and spreading under load.
- Proper compaction requires spreading crushed rock in lifts that match the effective densification capacity of your plate compactor, with each lift thoroughly compacted.
- Ordering 20 to 25 percent more loose material than the final compacted volume avoids shortages and reduces the risk of requiring a costly second delivery.
- Use well-graded crushed rock around 20 mm, compacted in 75 to 100 mm lifts, and add geotextile fabric over weak subgrades to maintain long-term stability.
Table of Contents
- Recommended Crushed Rock Base Depth by Project Type
- How Soil, Drainage, and Load Change Your Base Depth
- Excavation Rules: The Shoulder That Stops Edges From Spreading
- Choosing Crushed Rock and Compacting It Properly
- How Much Crushed Rock Do You Actually Need to Order?
- Your Step-by-Step Installation Checklist
- What Rokworx Installers See Go Wrong on DIY Jobs
- Where These Depth Recommendations Come From
- Sources
- FAQ
Recommended Crushed Rock Base Depth by Project Type
Those figures above are compacted depths, meaning the thickness after you have run a plate compactor over the material, not the loose depth you shovel out of the truck. That distinction trips up more first time DIYers than almost anything else on the job.
Here’s the quick-reference breakdown:
- Patios and walkways: around 100 mm compacted. Light foot traffic doesn’t demand much, but skipping a base entirely invites settling and cracked pavers within a year or two.
- Shed bases: 100 to 150 mm compacted, depending on the shed’s weight and whether it will hold a workshop’s worth of tools or just a mower.
- Residential driveways: about 150 mm compacted for typical cars and light SUVs, matching the minimum CMHA recommends for residential driveways.
- Heavy-use driveways: a greater compacted depth for heavy-use driveways with trucks, trailers, or heavy daily traffic.
Because crushed rock loses a significant portion of its volume once compacted, you need to order and spread more loose material than the finished number suggests. A compacted driveway base typically starts as more loose material before you compact it down. Gravel driveway guides commonly recommend a similar layered approach: a compacted sub-base of crushed rock topped with a thinner decorative layer for the finished surface.
If the soil is clayey, poorly drained, or will bear heavier loads, consider increasing these base depth recommendations rather than treating them as fixed limits.
How Soil, Drainage, and Load Change Your Base Depth
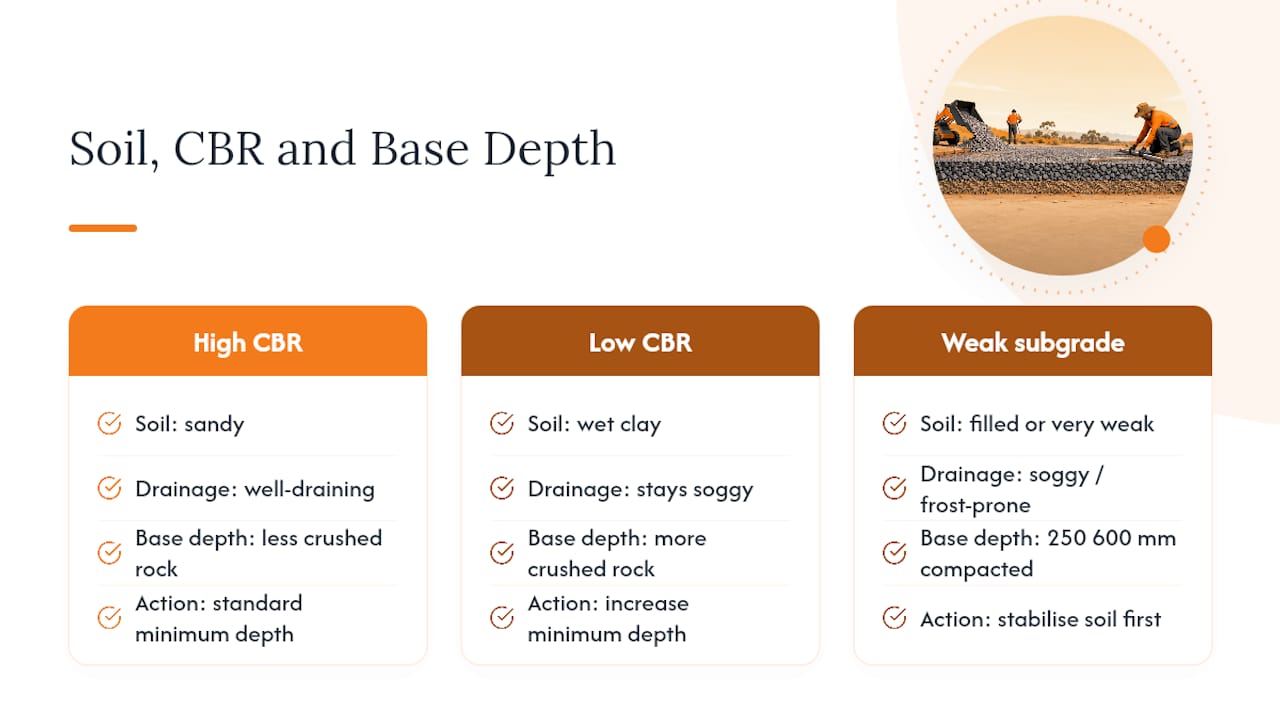
Not every block of dirt behaves the same way under a driveway, and that’s where the engineering term CBR, or California Bearing Ratio, comes in. CBR is essentially a score for how much a soil resists deforming under pressure. Sandy, well-draining soil scores high and needs less base rock to spread the load. Wet clay scores low and needs a lot more rock to do the same job, because the soil underneath simply can’t carry weight on its own.
You don’t need a lab test for a patio or garden shed, but you do need judgment. If your soil stays soggy for days after rain, if you’re building on filled ground, or if winter frost is a factor in your region, CMHA’s guidance is to increase the minimum base depth rather than stick to the ideal-conditions number. On genuinely weak subgrade, sub-base guides point to compacted depths of 250 to 400 mm, or stabilizing the soil itself with cement or lime before you ever place crushed rock, according to Concretemetric’s sub-base preparation guide.
If you’re staring at a low spot that never quite dries out, or a driveway that will carry a boat and a trailer daily, that’s the point to call in a geotechnical assessment rather than guess.
Excavation Rules: The Shoulder That Stops Edges From Spreading
Most DIY base failures start at the edges, not the middle. Design manuals recommend extending your base material past the finished edge to form a load-bearing shoulder at the perimeter, creating what’s called a shoulder. A 150 mm base needs 150 mm of extra rock spreading out sideways at the perimeter, according to standard design manual detailing. Skip this and the edges will slowly slump and spread under load, even if the middle holds up fine.
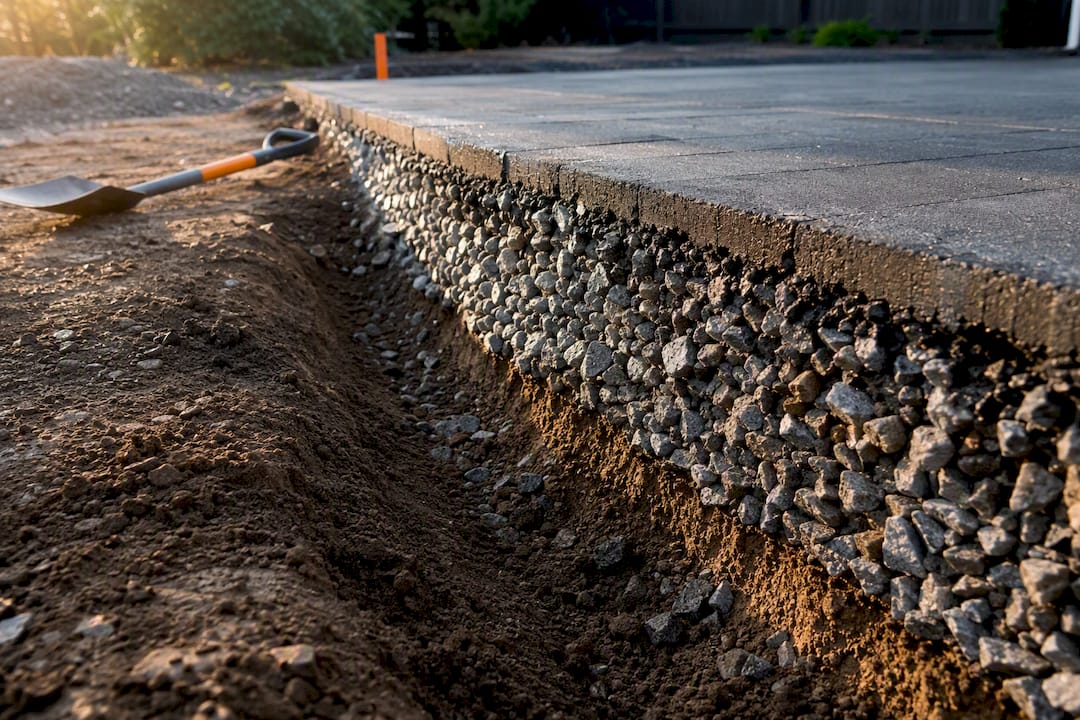
Work out your total excavation depth by adding the compacted base thickness, any bedding sand or paver layer, the finished surface thickness, and a small working allowance so you’re not fighting the shovel on the last centimeter. Before any of that, strip out topsoil, roots, and organic material entirely. Organic matter breaks down over time and leaves a soft spot exactly where you don’t want one. Check for underground services before you dig anywhere near existing utilities or structures, a step local council standards treat as a baseline safety requirement for excavation work.
Choosing Crushed Rock and Compacting It Properly
Not all rock is created equal here. Look for well-graded crushed rock or road base with a nominal maximum aggregate size around 20 mm. It compacts into a dense, interlocking layer because the mix contains a range of particles, from coarse rock down to fine dust that fills the gaps. Rounded river rock and clay-heavy fill do the opposite: they roll past each other under load instead of locking together, and they’re a common reason DIY bases fail early.
The single biggest technique mistake is dumping the full depth of rock in one go and compacting once. That leaves the bottom of the layer loose and uncompacted no matter how hard you run the plate compactor over the top.
- Spread crushed rock in loose lifts matching the depth a typical residential plate compactor can effectively densify in one pass.
- Compact each lift fully with overlapping passes before adding the next layer.
- For most homeowner jobs, a plate compactor in the 90 to 120 kg range handles patios, walkways, and shed pads; driveways benefit from a larger machine or extra passes.
- Repeat lift by lift until you reach your target compacted depth.
Pro Tip: If you’re unsure whether a lift is properly compacted, walk across it. A well-compacted surface won’t flex or show boot prints; if it does, run the compactor over it again before adding more material.
How Much Crushed Rock Do You Actually Need to Order?
Work backward from your compacted depth target, not forward from a guess at loose depth, and you’ll avoid the two most common ordering mistakes: running short mid-job or paying to dump a mountain of leftover rock.
- Decide your compacted depth target using the figures above (say, 150 mm for a driveway).
- Add a compaction factor of 20 to 25 percent to get your loose-fill depth, roughly 180 to 190 mm loose for that same 150 mm compacted target, a conversion echoed in crushed stone calculator guidance.
- Multiply your area by that loose depth to get volume, then check your supplier’s density conversion to translate cubic meters into tonnes.
- Add a small waste allowance, generally 5 to 10 percent, to cover spillage, compaction variability, and uneven ground.
Suppliers and DIY forums both note that ordering a bit extra costs far less than a second delivery fee for a top-up load, a pattern borne out in real shed-base examples shared on Bunnings Workshop.
Your Step-by-Step Installation Checklist
Follow this sequence in order and you’ll avoid the mistakes that cause most DIY base failures within the first year.
- Mark the area and locate services. Check for underground pipes, cables, and irrigation lines before any digging starts.
- Excavate to full depth, including the shoulder. Extend past the finished edge by a distance equal to your base depth.
- Compact the native subgrade first. Never place crushed rock straight onto loose, undisturbed soil.
- Lay geotextile fabric over weak, wet, or filled subgrade. It stops fine soil from pumping up into the rock layer and keeps the base structurally sound over time.
- Place crushed rock in 75 to 100 mm lifts, compacting each one fully before adding the next.
- Check grade and drainage before finishing. Water should run away from structures, not pool against them.
Run a simple check between lifts: stand on the compacted surface and look for flex or boot prints. If you see either, compact again. For small patios and shed pads, this checklist covers you completely. For driveways on questionable subgrade, tight access sites, or anywhere you’re unsure about drainage, that’s the moment to bring in a contractor for excavation and base work rather than risk redoing it in two years. Always confirm underground services are properly located and marked before excavation begins.
What Rokworx Installers See Go Wrong on DIY Jobs
The two mistakes we see most often on Melbourne properties are under-excavation and skipped lift compaction, both of which look fine on installation day and fail quietly over the following winter. Organic material left under a base, or drainage that was never checked, causes the same slow settling. If your site has soft clay, restricted access, or will carry real vehicle weight, hiring out the excavation and compaction costs less than fixing a driveway that’s sunk at the edges.
— MYBMC
Where These Depth Recommendations Come From
- CMHA’s paver base guidance for minimum compacted depths and adjustment rules.
- Melbourne’s engineering standards for local excavation practice.
Once your base is sorted, many homeowners tackle a retaining wall or garden edge next. Rokworx’s rock wall ideas page is worth a look if that’s on your list, and our guide to choosing the right rock for a retaining wall covers material selection the same way this article covers base depth. If you’d rather have the excavation and compaction handled properly the first time, our earthmoving team works across Melbourne on everything from driveway prep to full retaining wall builds. For readers laying pavers on top of their compacted base, SurfacesGalore’s limestone paver guide is a solid next stop on bedding and paver selection.
Sources
- Proper concrete paver base and depth: what to know and why it matters – Concrete Masonry and Hardscapes Association
- Standard drawings and design manual (over-excavation and shoulder rule)
- Melbourne engineering standards and specifications
FAQ
What Is the Recommended Thickness for a Crushed Stone Base?
It depends on use: about 100 mm compacted for patios and walkways, 100 to 150 mm for shed bases, 150 mm for residential driveways, and 200 mm or more for heavy-use driveways, per CMHA’s minimum base guidance.
Can You Use 20mm Gravel as a Sub-Base?
Yes, well-graded crushed rock with a 20 mm nominal maximum aggregate size is a standard sub-base material because its range of particle sizes locks together tightly when compacted in lifts.
How Thick Should a Gravel Base Be?
Thickness follows the same use-based ranges as crushed rock: roughly 100 mm for patios, 100 to 150 mm for sheds, 150 mm for driveways, and greater compacted depth for heavy-use areas, with clay soils or poor drainage pushing those figures higher.
How Deep Should 20mm Gravel Be?
For most residential jobs, compact 20 mm gravel to 100 to 150 mm depth, placed in loose lifts of 75 to 100 mm and compacted fully before adding the next layer.
Do I Need Geotextile Fabric Under My Crushed Rock Base?
Geotextile fabric is worth adding over weak, wet, or previously filled subgrade, since it stops soil from mixing into the rock layer and keeps the base from losing strength over time.


8 Comments
kkbdfm
Honestly, the analysis feels a bit surface-level. You need to dig deeper into the edge of the market, not just list features. Check out kkbd fm app ক্যাসিনো for a more comprehensive breakdown. The payment details are key, but the underlying risk assessment is what matters most.
reliefmedspharma
Order Pure Molecule relief Meds Canada ✅
gunnersmart
Buy Sophisticated Hand Guns Now
champion-bulldoggen
Champion-Europäische Bulldoggenwelpen zur Adoption
taktikwacht
Kaufen Sie diskret die besten Handfeuerwaffen in Europa
ketamight
https://ketamight.com – Order Ketamine
puremoleculelabs
https://puremoleculelabs.com Molecular Labs
vnlf168
Top notch experience so far. The graphics are crisp and the winning streaks are real. I’ll be spending a lot more time here for sure. vnlf168